Tuesday, December 30, 2014

Seed Shopping

In the weeks leading up to Christmas, my mailbox fairly burst from the daily influx of seed catalogs.  Some I recycle immediately, but others, I tucked away for later hours spent browsing, circling, folding pages...and general drooling over high color photos of things that could grow in my own garden, someday, if I was lucky (or wealthy enough to afford so many seeds).

Before I seriously sit down to choose the few seeds I will order for the next growing season, I first go through my seed stash and commence a thorough sort.  After tossing the very old seed (which for some reason, I always seem to hang onto...why?  Why? Who needs old carrot seed from 2002??), I make a list of which seeds are needed, and a few "extra special" seeds I'd like to try.  There are so many "extra specials", but I've learned that I can only try two or three new things every year, otherwise I wind up with too many things I'm trying out to really pay attention to how they do in my garden.

First, I order the seeds that I need: fresh carrot and onion seed, additional pea seed (as my year's stash was burned up in the shed where it was drying out), new salad greens.  And then, I get to go a little wild and do the really hard part: narrowing down my "extra special" experimental trial seeds for this year's garden.

After much debate, hemming and hawing, here's what I chose:
From the Baker Creek Heirloom Seeds catalog,  I'm going to give dahlias a go.  I chose Illumination, which is reportedly a dinner plate sized flower in shades of pink.  I also picked out Painted Lady sweet peas, which I think will LOVE growing in the new south garden space--all that extra sun from the box elder falling over is going to help make something beautiful!

From 
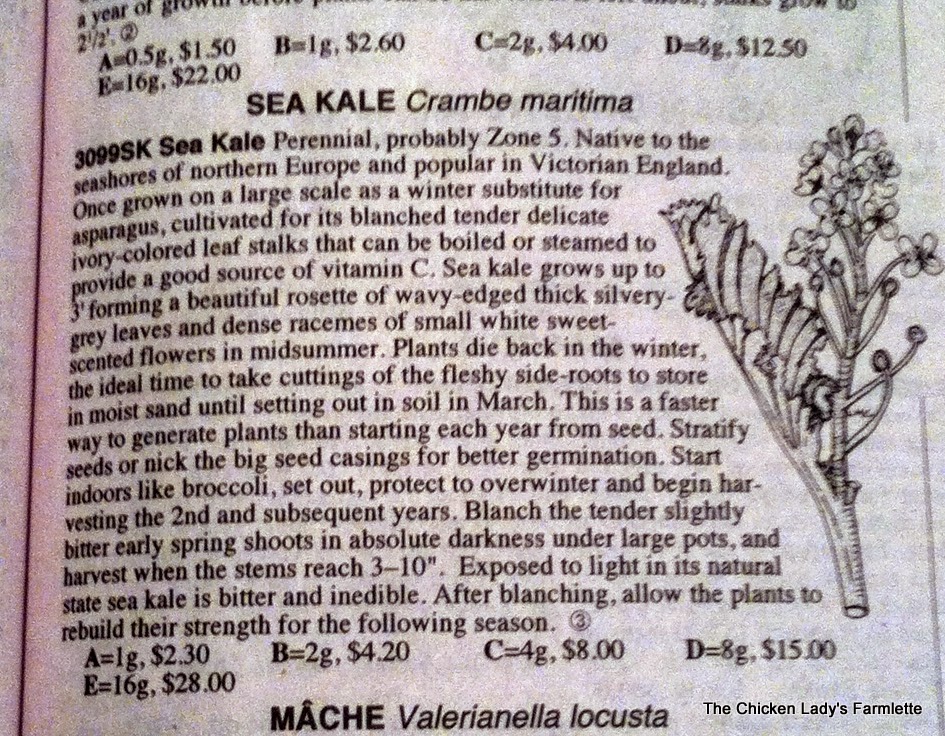
my friends at Fedco I'm giving this old Victorian era perennial plant a try: Sea Kale!  With any luck, it'll be a terrific contribution to my perennial veg corner garden.  Now, to round up some vintage blanching pots...
I'm hopping on the Breadseed Poppy bandwagon, with the help of Seed Savers.  I got a few other items as well (including that pea seed I mentioned previously), but I am excited about these purple-blue poppies.  Edible seeds following pretty purpleyness?  Yes please!

Of course, I haven't yet received the Seed Savers Yearbook or attended the annual Seed Swap, so I'm sure I'll get at least one more "exotic" to try growing.  Maybe lime verbena?  Or...well, who knows. 


Monday, December 29, 2014

Plans for the New Year

Hiya!  Did you miss me?

Sorry for the radio silence...there really hasn't been much going on around here that felt particularly shareable.  Oh, I suppose I could have moaned on about the whole insurance-adjuster-post-fire-insanity, but really, even I find that tiresome.  (Finally we seem to be nearing the end of that particular debacle, with the cutting of checks and hiring of contractor people  on the near horizon...huzzah!)

So, here we are in the post holiday coma of too much booze and sugar...isn't it nice?  I have a whole second week off from work, so I'm puttering about and making plans for various projects to take place before the winter snows vanish.  Thus far, that means I've done a lot of laundry, some sorting of old magazines and catalogs, and watching of YouTube garden programs.

It's been heavenly.

One of my better ideas has been to draw out plans to build what I hope will be Cabbage White Moth-proof cages for my brassicas.  Last year, those pesky critters nibbled away at my cabbages, Tronchuda kale, and even made in-roads on some of my lettuce.  Irritating beasties...anyway, I vowed that this summer, things would be different.  I had some lovely low tunnel row covers that helped the young plants get a head start, but once they grew more than 12 inches high, it was far too small and then my crops were left unprotected and at the mercy of the night-flying moths.  I think they enjoyed the Tronchuda kale even more than I did, as they ate it down to ribbons.

One of my winter projects is to build some four foot by four foot cage panels, with a two by four foot two-piece hinged lid.  I think the plants will have plenty of room to grow, while the screening I attach should keep the flying beasties out (and allow the rain to fall in).  Because they'll be in panels rather than a solid cage, I think it will also work to allow me to do serious weeding if any is needed, by simply pulling a panel out temporarily and clearing out any weeds that pop up and really take hold.  Of course, I'm either planting in my second-year new beds in back, or planting in the soon-to-be renovated front garden beds (they are due for a rebuild and complete overhaul this year)

Anyway, after developing my plan and pricing out materials, I think I should be able to build two cages for about $20 each.  If they provide me with even half-way decent protection from the dang cabbage loopers, I'll be very happy.  Plus, it's a winter time garden project and I really look forward to those!

Thursday, December 25, 2014

Sunday, December 21, 2014

Cookies Martha Would Love.

I don't usually go for fiddly Christmas cookies, but this year, I felt like channeling my inner Martha Stewart and whipped up a batch of gingerbread cut-out cookies.
Gumdrop buttons, homemade icing, fancy colored sugar sprinkles, mini-chocolate chips...I broke out the majority of the candy store and made an afternoon of it.

Of course, all the fancy decorations in the world can't hide a bad cookie.  So I used my patented unique to me gingerbread recipe which never fails:

*Two sticks of butter creamed together with two cups of granulated sugar.
* Add two eggs and at least 1/2 cup of dark molasses.  Go ahead, throw a little extra in...
* Now, add 1/2 tsp each salt, baking powder, ground cardamom, cinnamon.  Add 1/4 tsp ground cloves and allspice.  Add 1 teaspoon pumpkin pie spice, plus 1 teaspoon of ground ginger.
* Slowly mix in three and a half cups of flour. 
* When combined, pop dough into the fridge to chill at least a couple of hours.  It'll keep in there, covered, for a couple days in case you don't have time to roll and cut your cookies straightaway.  Use a little flour on the rolling pin and on your rolling surface to keep the buttery dough from sticking like crazy--it helps to keep the dough on the cool side when you're working with it, so popping it into the fridge between batches is a good plan.

Tah dah.  It makes for a deliciously crisp cookie with a lovely spice flavor. Roll out fairly thick, and bake for about 10 minutes.  Cool completely, and then go nuts decorating.
Ho Ho Ho!  I think Santa would like to find these cookies, don't you?


Friday, December 19, 2014

The Seduction of Seed Catalogs


One of my favorite thing about the approaching winter holiday season is the triumphant arrival of seed catalogs.  My copies of Baker Creek Heirloom Seeds, Seed Savers Exchange, Fedco and Irish Eyes Seeds have arrived and are waiting for the best time for a serious perusal.  That means, sometime next week when I have nothing more pressing to do than brew a second pot of coffee and adjust my comfortable jammies into an even more comfortable layering under a handy quilt.

The only thing better than pondering seed catalogs is discussing seed catalog options with other people.  Should one of us grow gourds?  And maybe a new color zinnia would be just the thing in the front flower garden...or how about sweet peas this year?  I love making lists, and adding little notes to them as I hear what other gardeners are contemplating.

Of course, before I order more seeds, I really need to reinventory my seed collection.  There's some seriously old seed tucked in there that needs to be pulled, like onions from 2010 and carrots from 2008.  I'm sure I've forgotten some great goodies in the mix that is my seed drawer.  I also need to track down a couple more locking plastic boxes to store my seeds in, as they've outgrown their current weenie ones.

Huh.  I think I found yet another pleasantly seedy activity to enjoy on my winter break.  Huzzah!

Wednesday, December 17, 2014

So Horrible, It's Terrific!

If you haven't seen this prime example of the strange yet wonderful Christmas-themed films from the late 1960s, you really need to watch this one.  Basically, the Martians intercept a newscast talking about a hilarious figure called Santa Claus, and conclude that he is the cure to the serious depression that is impairing their children's otherwise intellectually gifted childhoods.  So they kidnap him, leaving a psychotic robot in charge of the North Poleians.  A brother-sister duo of humans stows away in the space craft, and (after a series of unfortunate events) manage to save Santa, convince the Martians to find humor in their strangely green lives, and overpower the psychotic robot.  Thus, Christmas in the psychedelic age was saved.

It may make more sense if you drink heavily while watching it.

Thursday, December 4, 2014

Baking Time


Once the carols start playing and the Christmas tree goes up, I get the urge to make all kinds of cookies and candy.  I've got a few batches of dough stashed in the freezer (chocolate chip and peanut butter, to be made into those awesome Blossom cookies...oh, Blossom cookies, how I love you...)

One of my more fiddly cookies to make is spritz cookies.  They aren't too complicated, really, but they take time and have a few steps.  And then there's the whole loading of the cookie press part...well, they are worth the work, trust me.

It all starts with my patented easy dough.  I put one cup of butter straight from the fridge along with two and a half cups of flour, 1/2 teaspoon of salt, 1/4 teaspoon of baking powder, and 3/4 cup of granulated sugar, into my trust food processor.  Pulse until it resembles fine crumbs.  Next, add one egg, 1 teaspoon vanilla extract, 1 1/2 teaspoon almond extract, and a bunch of your favorite red food color of choice (natural or unnatural, pick your poison).  Using the dough setting on the processor, work the dough until it comes together in a soft smushy dough form.  Plonk into a bowl and chill in the refrigerator for about an hour.

After the hour is up, it is a beautiful smooth velvety dough, fantastic for making spritz.  A few years ago, I picked up a cookie press.  Best investment ever, really.  It came with all kinds of discs to make all kinds of shapes of buttery cookies.  My favorite for my Cherry Spritz (a holiday classic) is a star shaped one.  Then, I can add a candied cherry in the center, and bake at 375 degrees for ten minutes.  Allow to cool for a couple of minutes on the baking sheet, and slide over to a cooling rack to finish firming up.

My next step: try not to eat them all myself.

Wednesday, December 3, 2014

Christmas Mice


Fa la la la la....

Oh yes, the holidays are upon us!  I've been working away on little fun projects, making all sorts of gifts and gathering items to wrap up or stuff into stockings.  That's my favorite part of the holiday season: the finding of the perfect gift for each person on my list.  I'm not knitting up a storm this year, although there are a couple of things that have hit the needles.

One of them are for the smaller members of the household.  No, not the rodents hiding in the crawlspaces.  These are for the cats.  While my house cat Miss Vida has sadly declined to catch living mice, she does love these catnip filled knitted versions.  Yes, Vida is a 'nip addict.  She loves these mice...I've had to start hiding them in the closet (and locking the door so she can't break in and steal them.)

They are terrible simple to make:  With scrap sock yarn or DK weight yarn, cast on 20 stitches onto US size 2 needles.  Use the long tail cast on method, leaving a "tail" of at least six inches.  Knit across, and continue in garter stitch (knitting each row) until work measures about one inch.  Start decreasing by K1, K2Together, knit across to last three stitches, K2Together, K1.  Next row, knit across.  Continue in this manner until four stitches remain.  K2Together, leaving two stitches, then K2Together and pull yarn through last stitch ending work.  Cut yarn leaving at least eight inches to sew up work.  Fold in half like a taco, and you'll see the mouse take shape.  Using the "tail", sew up the short square end.  Pull the remaining tail through, and trim to be about three inches or so long (to be the mouse's tail).  Using the yarn left from ending your work, start sewing up the long angled edge at the point of the nose. After you sew up as far as the mouse's forehead (ok, use your imagination...) stop sewing and stuff in the dried up, crumbled up Herb of the Cat Gods: catnip.  If you can track down some nice organic garden grown stuff.  Don't use fresh, as it will mold inside the mouse...and that's just gross.  You'll need a couple tablespoons or so to fill your mouse.  Once stuffed, continue to sew up your mouse closing off the pocket and weave the end back through the stitches to secure it.

Delicious catnip mice.  Who wouldn't want to find that in their stocking?